Showing posts with label Android. Show all posts

Thursday, December 31, 2015

How to Setup Your New Chromecast


When we first reviewed the Chromecast back in 2013 we showed you how to set it up, but the Chromecast now comes in a sleeker, more powerful, and better designed package so we’re back with updated instructions.

What’s New With The Chromecast?

The most obvious change with the Chromecast is the form factor. The rigid HDMI-stick form factor is gone now and has been replaced with a flexible cable attached to a disk-shaped device. This is a great change as it makes it easier to position the Chromecast behind your HDTV and it better protects the Chromecast from damage. The original Chromecast had a seldom used extender (that we received more than a few emails about over the years) designed specifically to both improve the Wi-Fi signal and protect the HDMI jack. The new design builds a flexible extender right into the unit and ensures people use the feature (whether they need it or not).
Speaking of signal strength the new Chromecast features an updated Wi-Fi radio that finally supports 5GHz networks via 802.11ac wireless. For those who have had headaches with the 2.4GHz band it’s a welcome relief to both get a faster connection and the ability to move to a less congested band.
In addition to other small hardware changes under the hood the biggest change is brand new control software that radically extends the usefulness of the Chromecast. The old Chromecast app was pretty elementary and, while it got the job done, it existed pretty much to set up the Chromecast for the first time and find apps to use with it. The new Chromecast app will actually keep you coming back with features like the “Fast Play” prediction algorithm that pre-caches content it predicts you will want to watch across the services you use like Netflix and YouTube so you always get a snappy and ready to go playback experience.
Better yet, the Chromecast app now serves as a unified search platform for the video services you use; it’s never been easier to find exactly what you want to watch on the Chromecast than it is now with the new and updated software.
Finally, although it has yet to prove as popular as the traditional Chromecast, the new Chromecast update rolls out an audio-only Chromecast designed to link your streaming music services to your stereo.
If you already have a Chromecast you’re likely curious if it’s worth upgrading to the new model. Just like the old Chromecast the new Chromecast costs $35 (with an occasional sale here or there). If it’s in your budget to replace your Chromecast with the new one, we’d certainly recommend doing so: it really is a faster and smoother experience. If it’s not in your budget, don’t worry. The old Chromecast is compatible with the new software and will keep working just as well as it always has.

Setting Up The Chromecast

The setup process hasn’t changed much since the original Chromecast but it’s way more polished now. Unpack your Chromecast, plug it in, and you’re treated to clear step-by-step instructions.
If you don’t already have the Chromecast app installed on your smartphone or tablet, now is a great time to do so.
With the app installed, launch the app and select the “Devices” tab at the top of the screen. There you’ll find your new Chromecast ready for set up. Unless you live in a population-dense area like a college dorm or apartment complex you really don’t need to double check the identity of your Chromecast, but if you desire to do so you can look at the screen of your HDTV and the name of the Chromecast on the setup screen in the app to confirm they’re the same unit (you can see in the two screenshots above that both read Chromecast5108). Select “Set Up”.
The app will indicate the setup process is starting, prompt you to select “Next” and then you’ll see the screen above, on your mobile device, with a 4 character alpha-numeric confirmation code.
Confirm that the same code, as seen above, appears on the screen of your HDTV. Again, unless you live in a high-density area the chances of you setting up somebody else’s Chromecast is slim. Where this is handy, however, is if you’ve bought lots of Chromecasts. We’re huge fans of the Chromecast and with at least one Chromecast on every floor it’s definitely possible to mix them up.
Next, on your mobile device, select your region (e.g. The United States), then you’ll be prompted to name your Chromecast for easy identification and to toggle options like enabling guest mode and crash reporting.
The crash reporting bit is self explanatory, but if you’d like to read more about guest mode (which allows guests to use your Chromecast without logging into your Wi-Fi) you can read our full guide to enabling and using Chromecast’s guest mode here. In short: don’t worry about random people connecting to your Chromecast from the apartment down the hall; you need to see the actual screen and use the PIN on the screen in order to connect.
Finally, plug in the credentials for the Wi-Fi network you wish to connect the Chromecast too. If you have multiple Wi-Fi networks in your home and/or distinct SSIDs on your main router be sure to put the Chromecast on the Wi-Fi network/SSID you normally use with the device you intend to cast from (e.g. your iPhone) because it must be on the same Wi-Fi node.

Using Your Chromecast

There are two ways to use the Chromecast. You can cast from a mobile device and you can cast from your computer via Chrome browser plugin. If you want the full run down on the desktop casting option, check out our guide Mirror Anything from your Computer to Your TV Using Google Chromecast here.
Although the desktop casting function has its uses the mobile casting experience is far more polished and certainly the source of the Chromecast’s popularity.

Finding Apps

The easiest way to get started actually using the Chromecast is to use the Chromecast app to see what apps you already have on your phone that support casting. After completing the setup open up the Chromecast app.
In the screenshot above you can see that the Chromecast app has already populated the “What’s On” tab, the default view, with potential YouTube videos and Netflix content because we have both apps on our iPhone.
If you don’t have any apps yet or want to explore what else is out there, you can either select the “Get Apps” tab as seen above or you can scroll to the bottom of the “What’s On” tab where you’ll both see other apps on your device that can cast to the Chromecast (like Plex or other streaming apps) and you can click “Get More” beside those apps to search for more related apps.

Searching for Content

While we’re still in the Chromecast app let’s take a look at the new unified search function that really makes it easy to search across services like YouTube, Netflix, and Google Play to find the content you’re looking for. Let’s say, for example, want to get started with the popular TV show The Walking Dead.
Simply enter the key words for the content you’re looking for in the search box, found at the top of the Chromecast app, and you’ll be treated to a page of search results right inside the application.
Select the result you want, in this case the entry for the original series as seen above to the right.
There you’ll find a summary of the show and, most importantly, a “Watch” button linking you right to the Netflix app. If you tap the “Watch” button Netflix will launch just as if you had searched for the show within the app. Let’s take a look at how to cast the show to your TV in the next section.

Playing Content

Once you’ve loaded an app with Chromecast compatibility, like the Netflix app we just launched courtesy of our search query in the Chromecast app’s unified search dashboard, playback is as easy as can be (and this ease of use is definitely why the Chromecast is so wildly popular).
Any time you’re in an application that can cast to the Chromecast the Chromecast logo, seen above in the upper right-hand side of the screenshot, will appear. Tap the icon and the mobile app you’re using will automatically kick the stream over to the Chromecast and the stream will begin playback.
The extra nice thing about the Chromecast is that all the unpacking/decompression of the video stream is handled by the Chromecast itself (not the casting device) so even if your device is old, battered, and sporting a slow processor you can still use the Chromecast with ease. A such old Android and iOS devices make for great Chromecast “remote controls” you can leave plugged in next to the couch in the living room.

5 great language learning apps

Learning a new language is a process that might not sound like immediate fun, but it opens new horizons and possibilities to learn about and see different cultures.

With a powerful smartphone in your pocket, you have one more aid in the learning process, but what are the right apps to use? These days, DuoLingo is all the rage for many reasons: it's a well-structured system to learn a language that touches upon not just one, but the multiple elements of learning, including speaking, listening, reading and writing.

It is not the only one worth noting, though. In this round-up, we have selected some great alternative apps that will speed up your language learning. Take a look at them right below.

English Lesson with Gymglish


Download on Android | iPhone

5 great language learning apps that are not DuoLingo

Most PhoneArena readers are English speakers, but for the great many across the world who are trying to learn English, this app by Gymglish is a fun new way to get the grips of the language in a few simple steps with plentiful graphical clues provided along the way. The app serves knowledge lesson by lesson, in dozes of one lesson served every morning so that you can make constant, steady progress, and it also shows you scores at the end of the lessons. The whole language course is based around the story of the Delavigne Corporation and features both reading and listening exercises, with varied access and some elements of business English. Each lesson takes around 10 minute to complete, a small time investment that could yield great results in the longer term.

French Lessons by Fantastique


Download on Android | iPhone

5 great language learning apps that are not DuoLingo

When the focus of a language app is just one language, this provides a much more focused way to learn a language and the French Lessons by Fantastique app is a brilliant example. Dedicated solely to learning French, it follows a similar model as the previous app: daily lessons served in the morning that take around 10 to 15 minutes to complete. Infused with French culture and humor, the stories in the lessons are easy to digest and the narrator in many of them is no other than a virtual Victor Hugo. The app features various accents, a daily score and - quite importantly - explanations for your answers.

Chinese Skill


Download on Android | iPhone

5 great language learning apps that are not DuoLingo

Chinese Skill is the only app you need if you are a total beginner who wants to learn Chinese, and here is why: it guides you gently in a DuoLingo-like play-based approach with words, it has native pronunciation that you can also slow down, and this will save you a lot of the boring theory about pinyin pronunciation and the four tones, it displays both characters and pinyin along with actually well translated English equivalents, and it is miraculously, mind-bogglingly, completely free (as in ad-free and in-app-purhcase free).

We've tried multiple other apps and they are a waste of time, especially for beginners. Spare yourself this lost time searching and the trial and error, and just focus on mastering the knowledge summed up in Chinese skill before you dive in further into Chinese.

Learn Languages Rosetta Stone


Download on Android | iPhone

5 great language learning apps that are not DuoLingo

The Rosetta Stone system has been crafted and perfected over time, so it comes with a reputation that not many others can match. The app, however, requires a hefty $200 in-app purchase for each of the 19 languages it supports (you have free access only to the first lesson, so you can try it). If you decide to spend the money, though, you are getting a comprehensive language learning system. The full course takes you on a journey through the basics, common greetings and introductions, vocabulary used during shopping, travel topics, past and future expression, and words in the area related to friends and social life.

busuu


Download on Android | iPhone

5 great language learning apps that are not DuoLingo

busuu is an app that comes with a unique premise: learn a language with the help of native speakers, who will help you get exercises right. The app focuses on getting you right up to speed with the most commonly used 150 topics and 3000 words that you will need, and it allows you to set personal learning goals and strive towards reaching them. It covers all the important aspects of language learning: vocabulary and grammar lessons, audio dialogues and interactive tests. busuu costs $11 for a 1-month subscription, $50 for a 6-month sub, and $65 for a 12-month subscription (all are automatically renewed until cancelled), but you can try it and see what it's all about for free.

Tuesday, December 8, 2015

Android 6.0.1 Released; Includes New Emoji, Security Patches and More!

Just when people were starting to get settled into Android 6.0 Marshmallow, Google has added on a point release to the fray.
The Android 6.0.1 Marshmallow update comes in the form of the MMB29M build which is available to download for Nexus devices. Devices for which the factory images are live at the time of writing are:
  • Nexus 6P
  • Nexus 5X
  • Nexus 6
  • Nexus 5
  • Nexus Player
  • Nexus 9 LTE & Wifi variants
  • Nexus 7 2013 Wifi & SIM variants
The update should be rolling out via OTA to the aforementioned devices in a phased manner. If, however, you cannot wait to be on the latest version of Android as soon as it comes out (which is most likely the case for XDA users), you can grab the factory image and flash it manually.
So, what does this update contain? For starters, the newest build adds support for around 200 Unicode 8 emojisto Android. This brings Android’s emoji game at par with Apple’s iOS 9.1, much to the rejoice of people who were frustrated at being sent what appeared at blank boxes on their devices. Ars Technica created a full gallery of the added emojis, so head on over there if you want to see all the newest additions.
emojimation_latest3
Apart from the new emoji, the 6.0.1 update improves upon the navigation bar on tablets. The “back” and “home” buttons have been shifted towards the left, while the “overview” multitasking button has been moved to the right. The change makes it easier to hit the buttons with your thumbs when you are holding the tablet. Also included is the “until next time” option for Do Not Disturb, a feature that was introduced in Android 5.1 but was missing on Android 6.0.
2015-12-07-08.59-980x653
Along with all the visual and functionality changes, the MMB29M build also includes security patches. It bumps up the Security Patch Level of supported Nexus devices to December 1 2015, meaning that it incorporates all fixes up till this date. OEM’s should have been informed of this security update one month prior to public disclosure, so we can expect these making their way through to other non-Nexus flagship devices, hopefully. For a detailed list of all CVE’s addressed in this update, please refer the security bulletin page.
Even if you are not overly excited about the new emoji support ðŸ˜€ , the new update is worth it from a security standpoint as it fixes upon a few issues which have had a severity status of “Critical”. You can either download the image and flash it manually, or you can wait for the OTA to hit if you wish to avoid a data wipe on locked bootloaders.
What do you think about the newest release? Are the changes worth bumping the release version to 6.0.1? Let us know your thoughts in the comments below!

Saturday, December 5, 2015

How to See Passwords for Wi-Fi Networks You've Connected Your Android Device To

Over the course of owning your Android device, you've probably connected to dozens of Wi-Fi networks. School, home, work, the gym, your friends' and family's houses, coffee shops—each time you typed in one of these Wi-Fi passwords, your Android device saved it for safekeeping and easy access in the future.
The only trouble here is that you can't view the saved Wi-Fi passwords that your device has stored. Perhaps you want to connect a second device to one of these networks, or you're with a friend who wants to log in to the same hotspot, but without a way to access the actual passwords that your device has stored, you're out of luck.
So developer Alexandros Schillings decided to remedy this issue with an app that allows you to view every Wi-Fi password that you've ever saved on your Android device. The app requires root access, but beyond that, it makes finding and sharing your stored Wi-Fi passwords incredibly easy.

Step 1: Install WiFi Key Recovery

Schillings' app is called WiFi Key Recovery, and it's available on the Google Play Store for free. Search the app by name to get it installed on your rooted device, or head directly to the install page at this link.

Step 2: Viewing Saved Wi-Fi Passwords

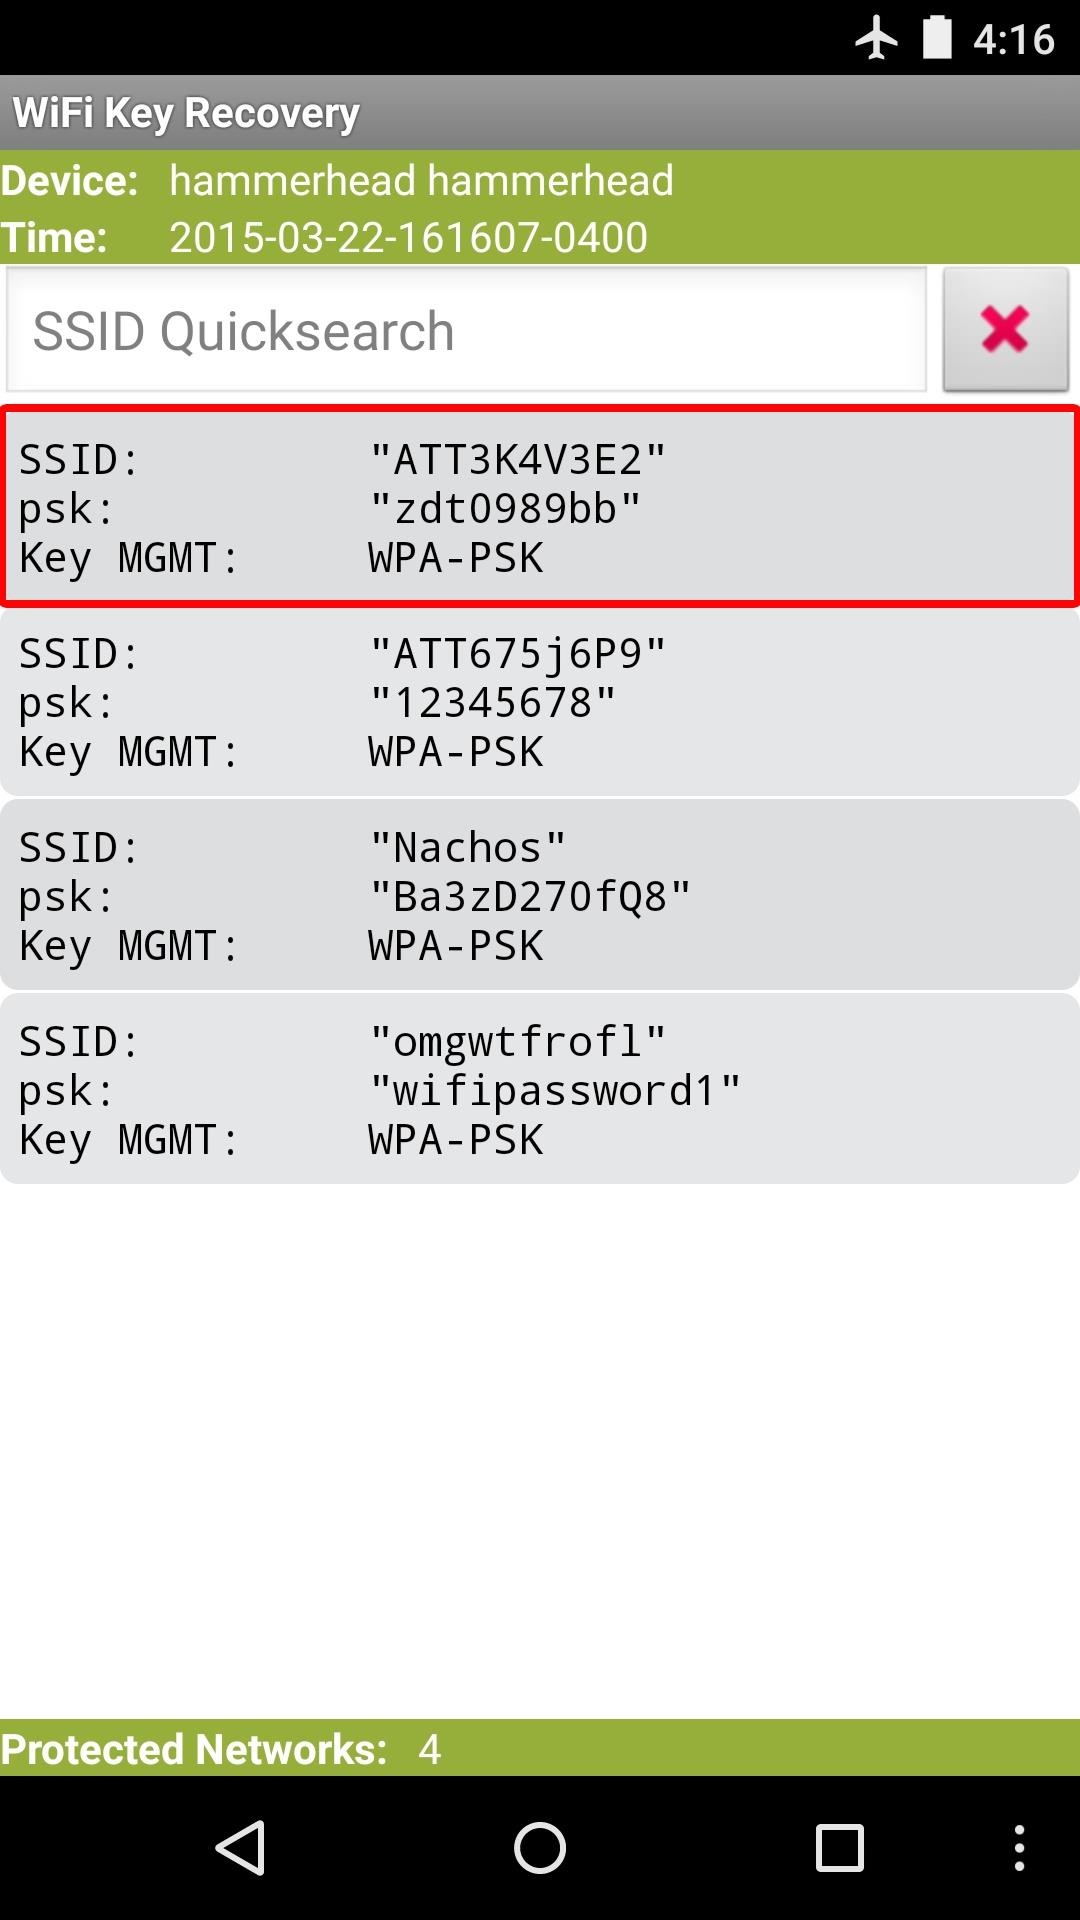
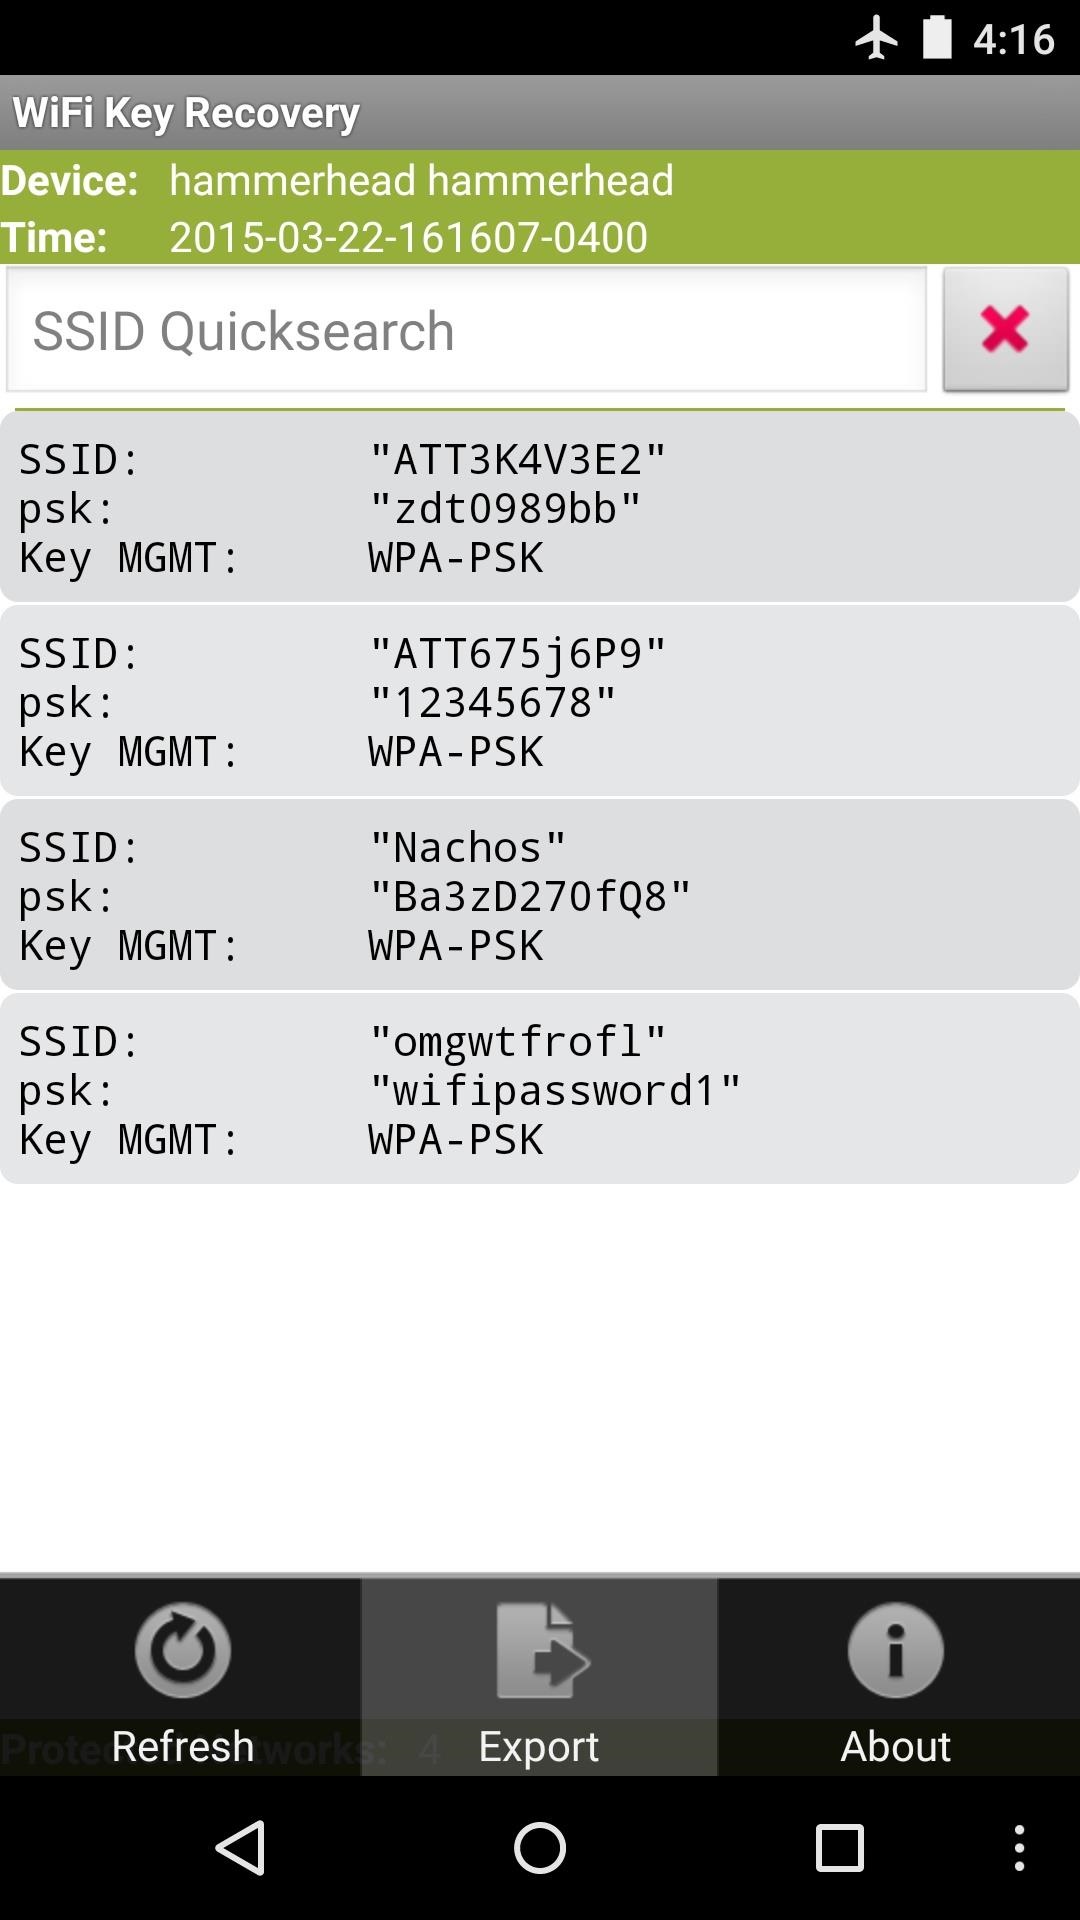
When you first launch WiFi Key Recovery, the app will ask for Superuser access. Tap "Grant" on the popup, then you'll be taken to a list containing all of the Wi-Fi networks that you've ever connected to, where each entry shows a password in the "psk" field.
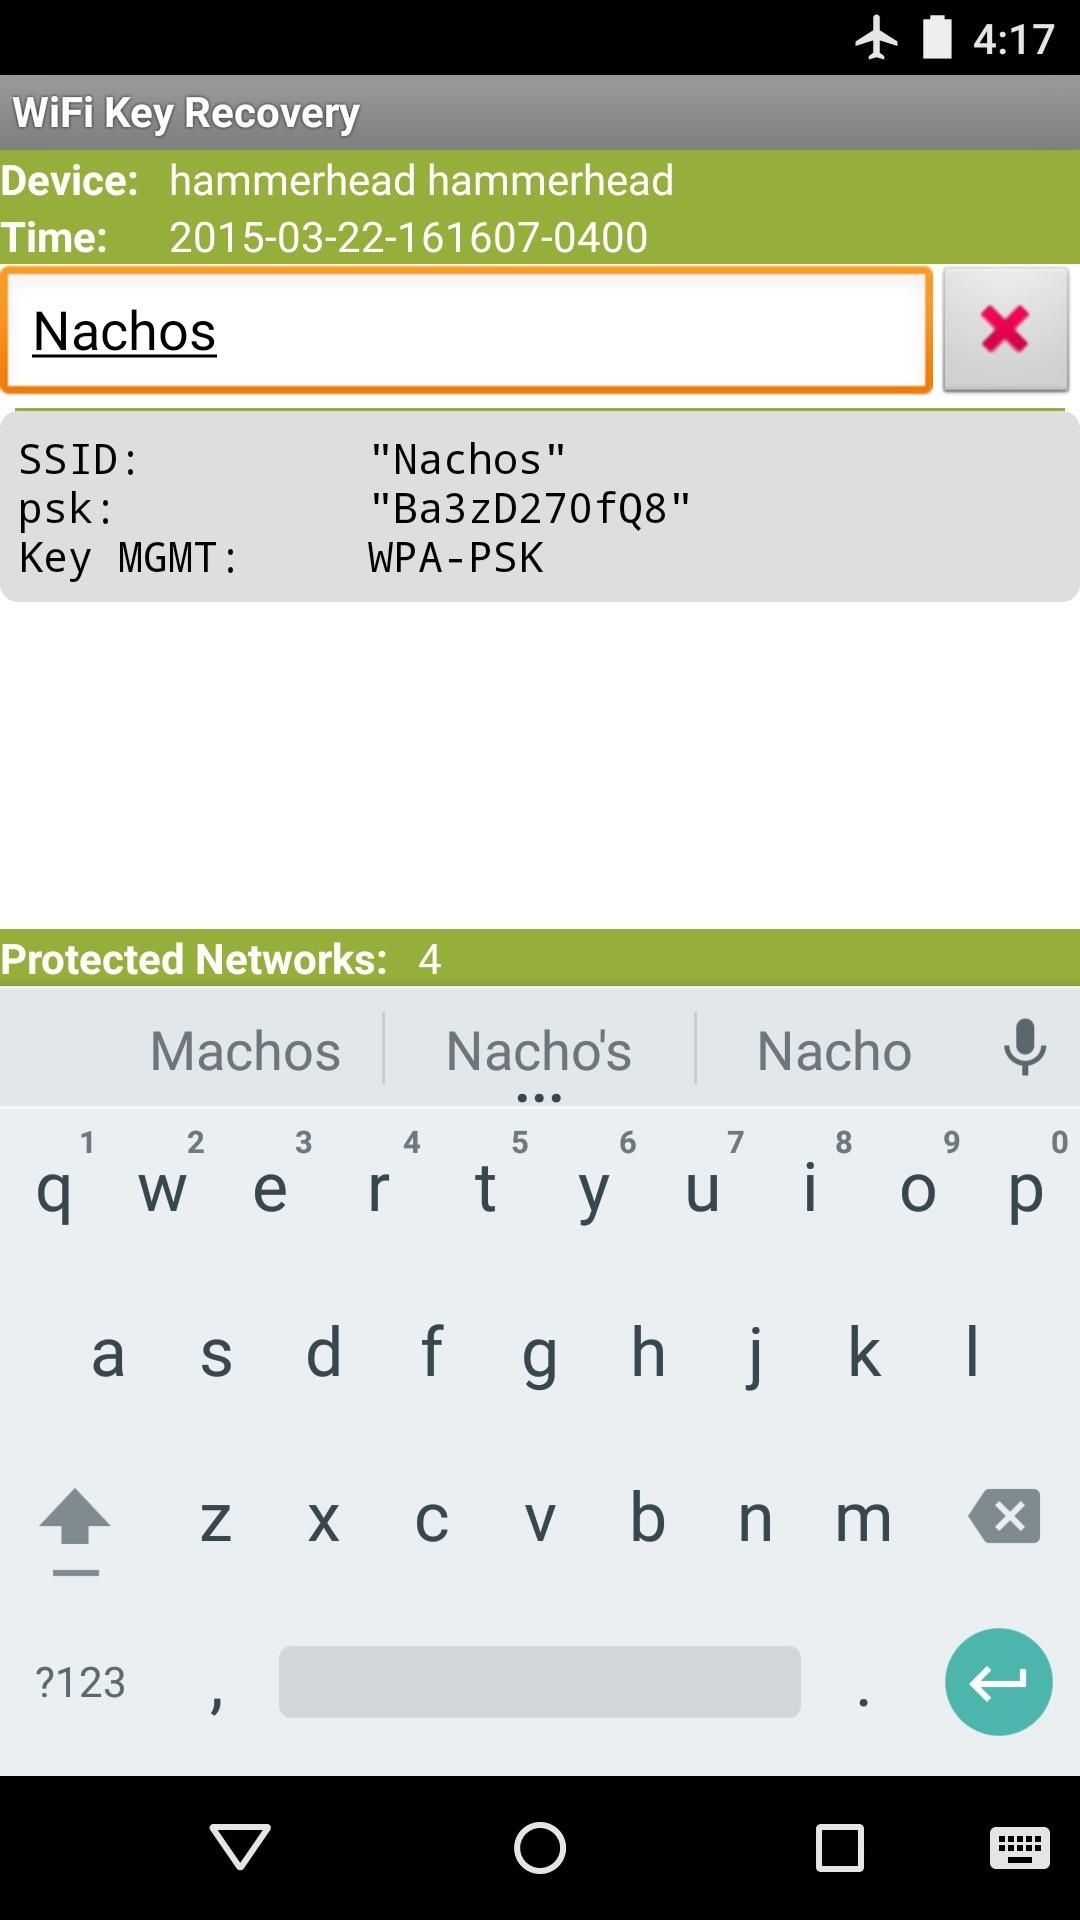
If you've connected to many different Wi-Fi networks over the course of owning your Android device, your list may be quite long. If that's the case, you can search for a particular Wi-Fi network by using the "SSID Quicksearch" field.

Step 3: Sharing Wi-Fi Passwords

If you need to share one of these passwords with another device, you have a few options. Start by tapping any entry in the list, then a small menu will pop up. This allows you to use Android's built-in sharing system to send either just the password, or the entire entry. There's also an option for sharing via QR code, but that requires that you install an additional app.
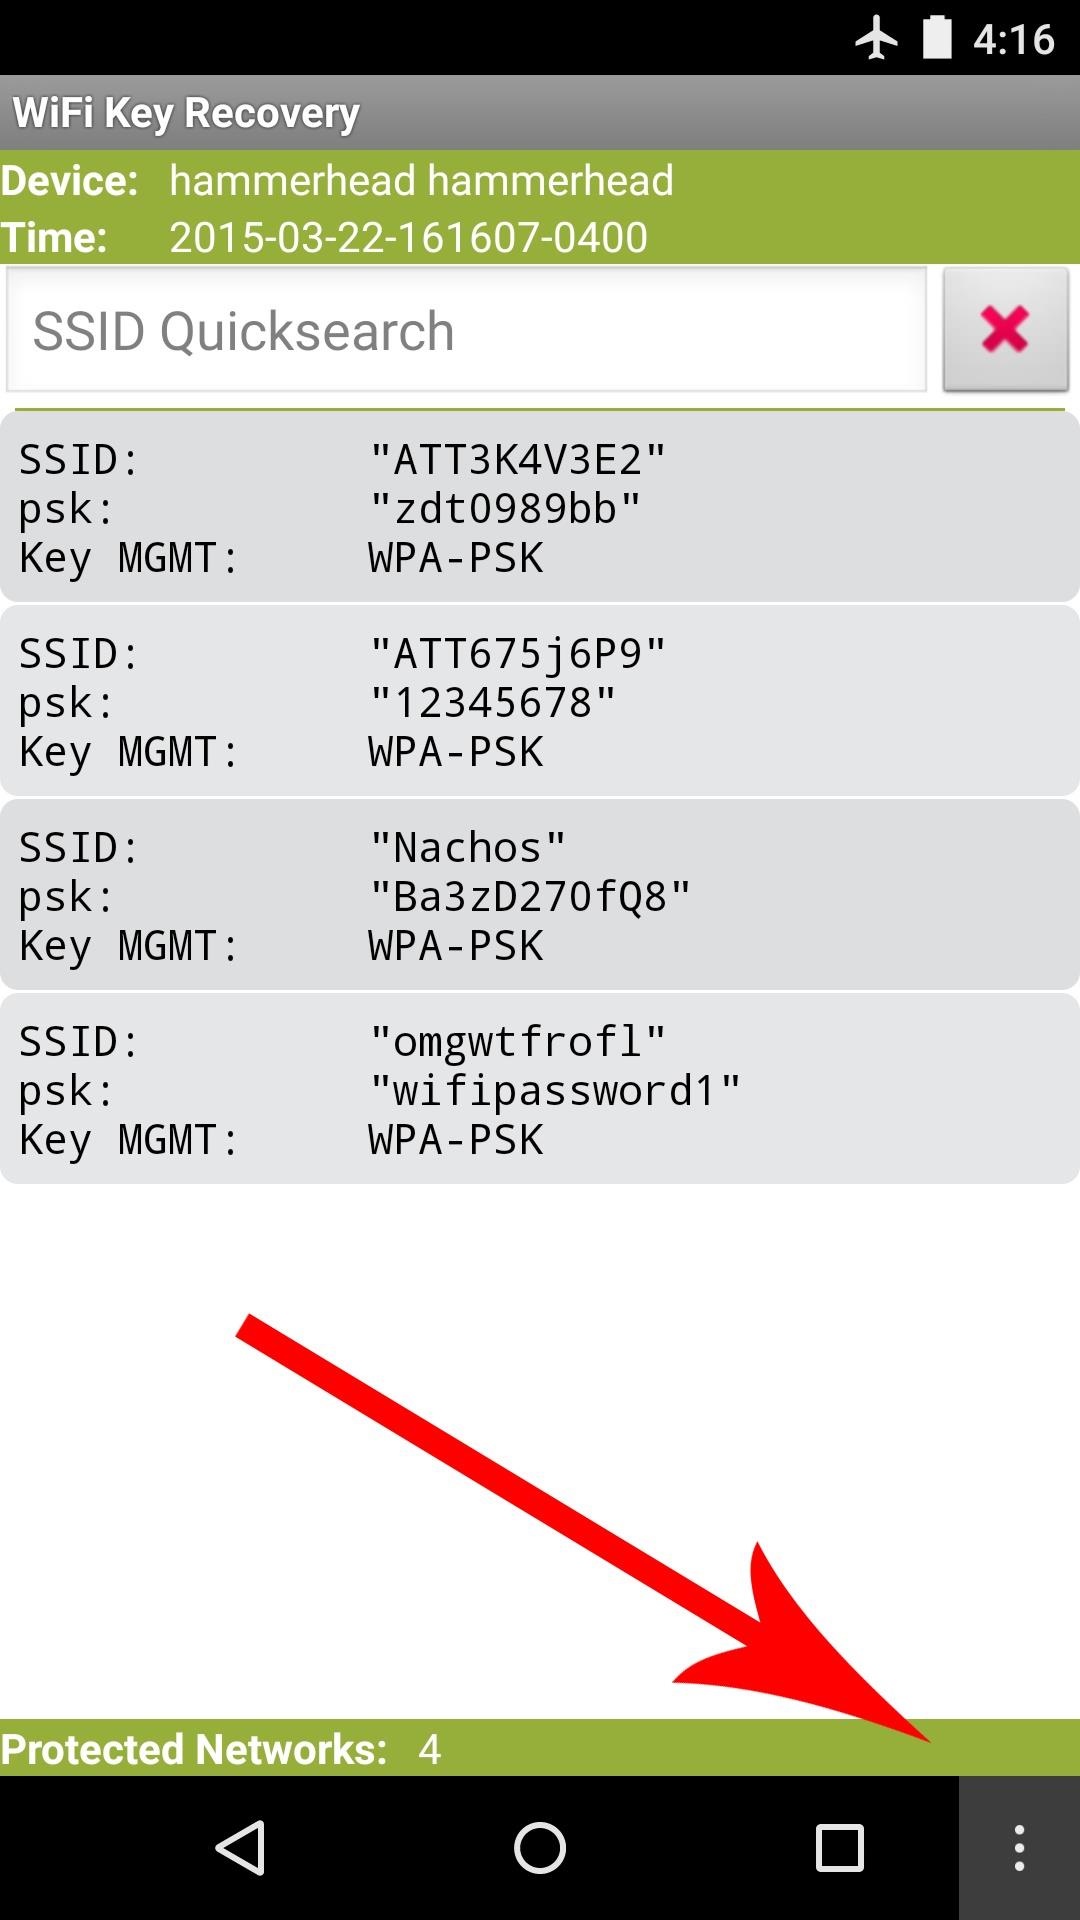
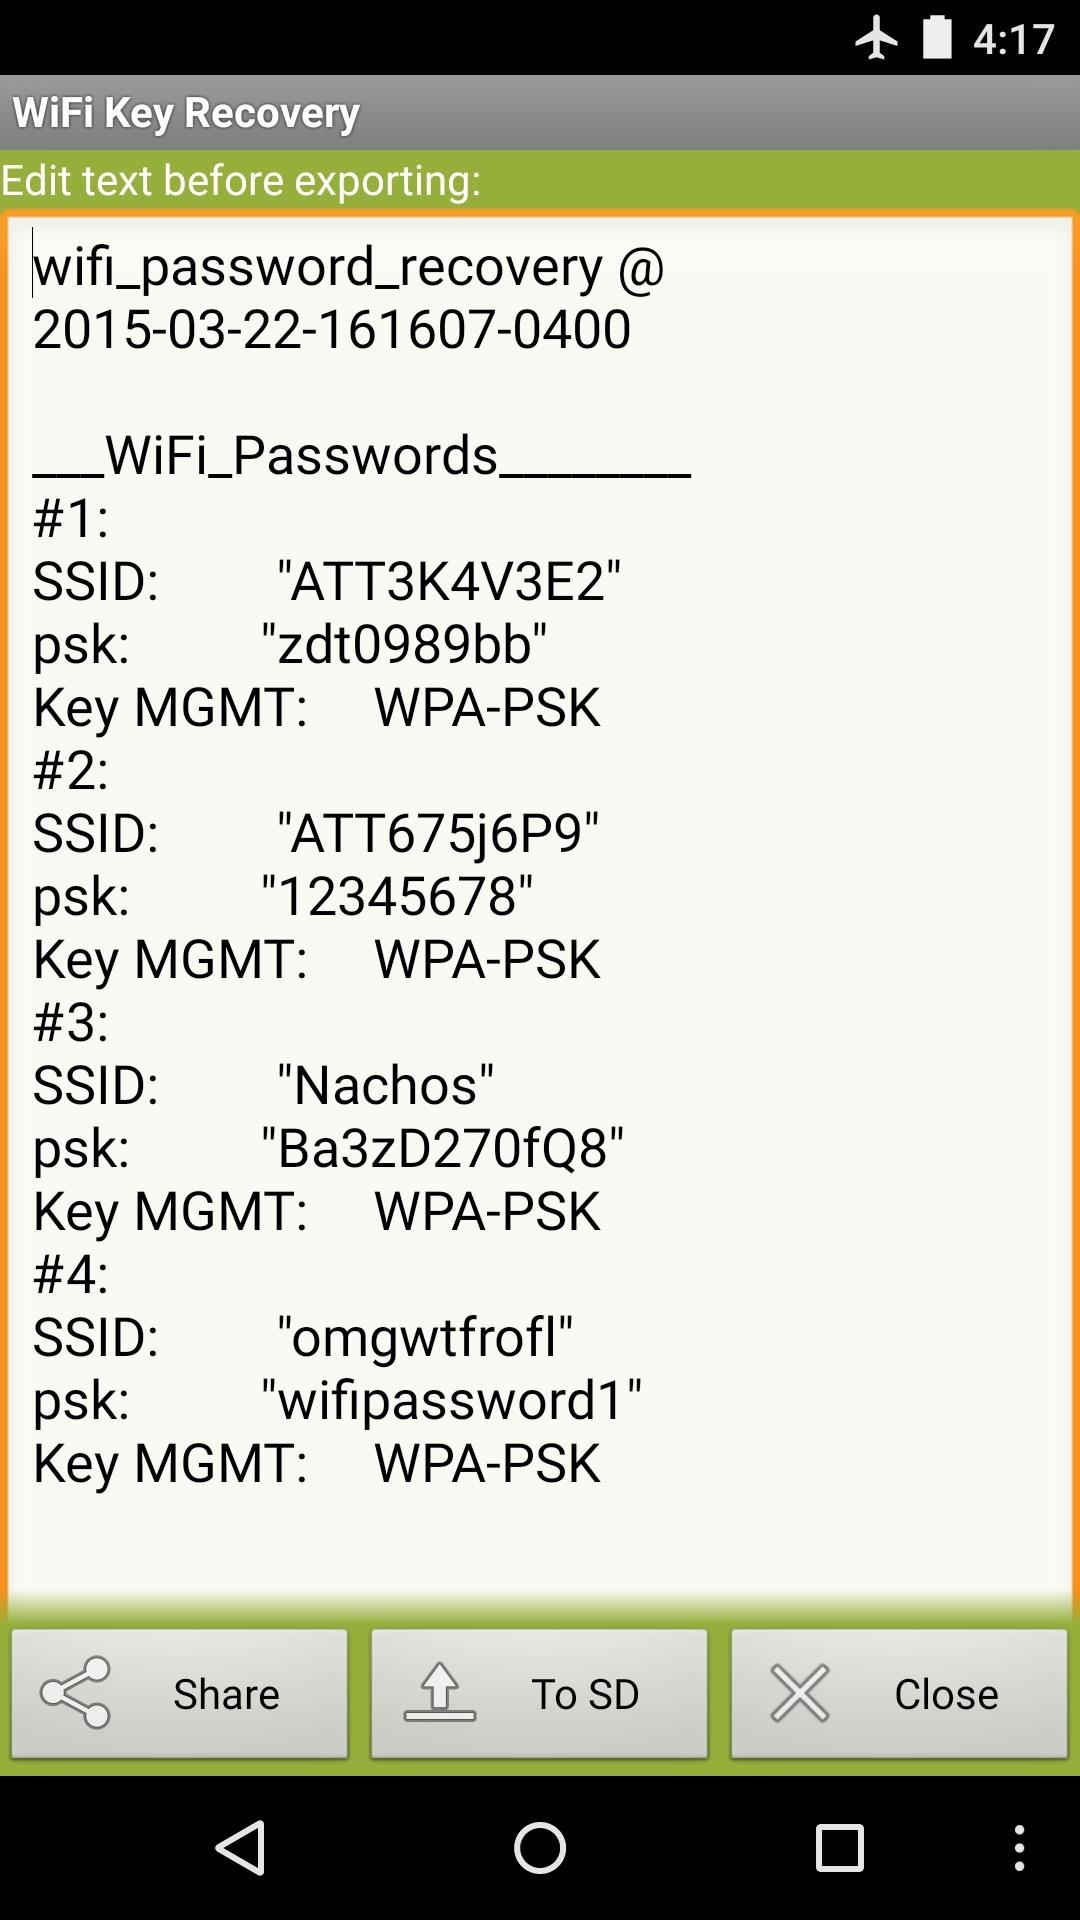
If you'd like to store this entire list for safekeeping, tap your device's hardware menu button (or the three-dot menu button in your software navigation bar). From here, choose "Export" to generate a text file with all of this information.
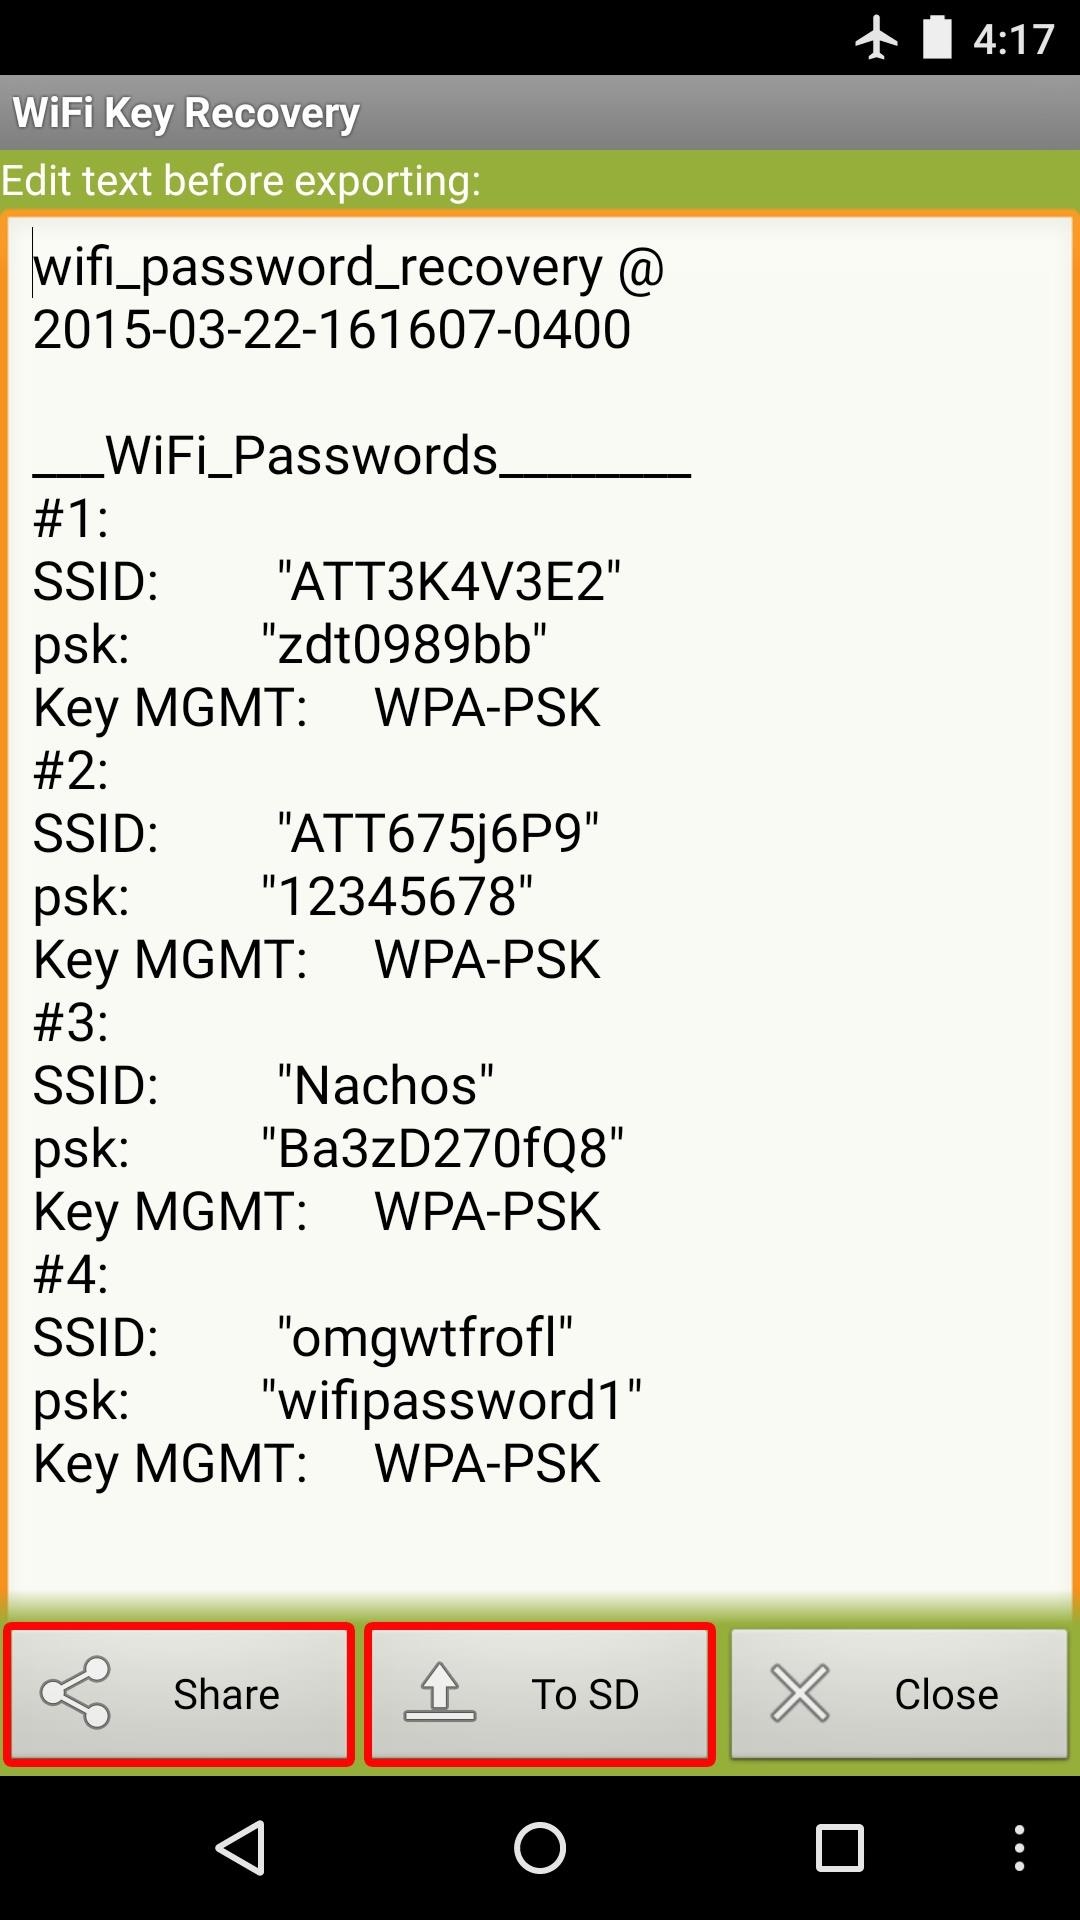
From here, you can use Android's share menu to send this file to another device, or you can simply tap "To SD" if you'd rather save a copy of this text file to your device's storage partition. And of course, if your list isn't too long, you can always take (and share) a screenshot.

How to Easily Make Your Own Android Apps with Tasker

 Step 1: Install Tasker & App Factory

Since Tasker App Factory operates as a plugin, you'll need to have the main app, Tasker, installed on your device to use it. Tasker is a paid app that normally costs $2.99, but if you'd rather test the waters before you buy it, you can sideload the 7-day trial version from this link. Otherwise, use the link below to install or update Tasker from the Google Play Store.
Then, with Tasker installed, you'll also need to download Tasker App Factory to export your tasks and scenes as full-fledged apps. You'll notice once you've installed the app that there is no "Open" button—this is because App Factory operates solely as a plugin for Tasker, meaning all of the work will still be done through the main Tasker app.

Step 2: Create a Task as a Base for Your App

With both apps installed, creating your own Android app is as simple as making a Tasker task, then exporting it as an app. Essentially, every action your task performs will be performed by the app once you've exported it and installed it on any phone, so the possibilities here are virtually endless.
To begin, head to the Tasks tab in Tasker's main interface, then tap the +button at the bottom of the screen. From here, give your task a name, and make sure it's a good one since this will also be the name of your app.
Next, tap the + button at the bottom of the Task Edit menu to add an action or set of actions to your task. One thing to note while you're doing this is that any dependencies your task might have will also be a dependency for your app. As an example, if actions in your task require root, your app will also require root.
Also note that, for similar reasons, your task cannot rely on an external Tasker plugin such as Secure Settings, since the app you end up creating from it will not necessarily be able to call on these external plugins on all systems.
When you're done adding actions to your task, head back out to the Task Edit screen and tap the button in the bottom-right corner to add an icon. From here, use the following menu to either pull your icon from an existing app or add an icon from your local storage. In the end, this will be your app's launcher icon, so make sure to pick out a good one.

Step 3: Add a Scene to Your Task (Optional)

Exporting a task as an app will result in an app that simply runs your task and exits—meaning there won't be a user interface. This should be fine in most cases, but if you'd like to create an actual UI for your app, you'll have to make a Tasker scene, then add it to your task.
If you'd prefer to go this route, head to the Scenes tab in Tasker's main interface, tap the + button to create a new scene, then give it a name. From here, use the next menu to re-size your scene, which can either be a popup or a full-screen window. When you're satisfied with the layout, tap the Zoomicon in the bottom-right corner to enter edit mode, where you can add buttons and other elements.
From here, tap the + button at the bottom of the screen to add a new element—in this example, I'll be adding a button that reboots my phone. After adding an element, you'll be taken to the Element Edit menu, where you can assign a label (such as "Reboot" in this example), then adjust the size and scale.
Once you're buttons or elements are all arranged the way you'd like them to be, head over to the Tap tab on the Element Edit menu to choose what will happen when this element is pressed. From here, treat it like a regular task—so tap the + button at the bottom of the screen to add an action or set of actions to this UI element.
Once you're finished adding elements and actions to your scene, back out to the Scene Edit menu, where you can select the finger icon in the bottom-left corner to rearrange and re-size buttons or UI elements. When everything looks good to you, simply back out to Tasker's main menu.
Next, to allow Tasker App Factory to export your scene as a standalone app, you'll have to include it in a task. So head over to the Tasks tab in Tasker's main interface, then tap the + button and give your new task a name. From here, select the "Scene" option from the following menu.
After that, choose "Show Scene" and type the name of your scene into the first field on the Action Edit menu, then back out to Tasker's main screen. At this point, you've created a task that will simply run your scene, which will then provide a user interface once it's exported as an app.

Step 4: Export Your Task as an APK

Whether you only created a task or you chose to add a scene, exporting your creation as an app is simple. Start by heading to the Tasks tab, then long-press your task. From here, tap the three-dot menu button in the top-right corner and choose "Export," then select "As App" from the following menu.
From here, you'll see a disclaimer that explains the usage rights for your app, so read it carefully, then tap the check mark. Next, if you opted to create a scene for your app, you'll be given a chance to assign details like package name and version number.
Once that's out of the way, Tasker will convert your creation into an installable APK. When that process is finished, you can either tap the Android icon in the bottom-right corner to install the app on your own device, or simply tap the check mark to dismiss the dialog.

Step 5: Install the APK on Any Device

Once you've exported your task as an app, you'll find the APK installer file in the /Tasker/factory/kids folder on your device's internal storage or SD card. If you'd like to share this app with someone else, just send them the APK and have them sideload it on their device.
From there, anytime someone runs your app, it will execute your Tasker task or display your Tasker scene. At this point, all that's left to do is sit back and gloat, because you're officially an Android developer now.
Check out the app I made for this tutorial by sideloading it from here (root required).
What's the best app you've created using Tasker App Factory? Tell us about it in the comment section below