Showing posts with label Windows. Show all posts

Monday, January 4, 2016

Prevent Windows From Restarting Your PC After Windows Updates


image
Have you seen that message in Windows 8 that tells you your computer is going to reboot and there is not a thing you can do about it except save your work? Here’s how to make sure that never happens again. This tip works for Windows 7 as well.
Note that we have covered this method before for preventing Windows 7 from automatically rebooting. This article has two methods for doing the same thing.

Prevent Windows 8 From Restarting Your PC After Windows Updates

Press the Win + R keyboard combination to bring up the run dialog then type gpedit.msc and press enter.
image
When the Local Group Policy Editor opens, navigate to:
Computer Configuration\Administrative Templates\Windows Components\Windows Update
image
On the right hand side you will see a setting titled:
No auto-restart with logged on users for scheduled automatic updates installations
Double click on it.
image
From here you will need to enable the setting by changing the radio button from “Not Configured” to “Enabled”, then clicking apply.
image
As always, we recommend you force a Group Policy update so that the changes will reflect immediately.
image
image
That’s all there is to it.

Using the Registry

If your version of Windows 8 doesn’t ship with the Group Policy editor, you can always use the registry to disable these reboots. Again press the Windows + R keyboard combination to bring up a run box – type regedit then hit enter.
image
Now navigate to:
HKEY_LOCAL_MACHINE\SOFTWARE\Policies\Microsoft\Windows\WindowsUpdate\AU
Note: If you don’t see the Windows Update or AU keys you may have to create them.
Then create a new 32-bit DWORD called NoAutoRebootWithLoggedOnUsers.
image
Then double click on it and give it a hex value of 1.
image
Reboot your machine and you’re good to go!

Thursday, December 31, 2015

How to Enable System Restore (Repair System Problems) on Windows 10


With Windows 10, Microsoft seems to have disabled System Restore by default — at least on some PCs. System Restore has been around since Windows ME, creating snapshots of system files you can restore if a problem occurs.
Windows 10 still does contain System Restore, so you can re-enable it if you feel more comfortable with System Restore as a safety net. Windows 10 also offers other system-recovery features, helping lessen the need for System Restore.

Why Did Microsoft Disable System Restore?

Microsoft hasn’t really explained why it’s not enabling System Restore by default. However, we do have some idea. System Restore can use quite a bit of disk space when it creates those snapshots, and Microsoft is trying to get Windows 10’s disk space requirements down. Microsoft wants Windows 10 to run on devices with as little as 16 GB of internal storage — all the better to compete with Chromebooks and cheap Android tablets.
System Restore is also less necessary thanks to other features in Windows 10 that can quickly get your Windows system back to a fresh state without a full reinstallation of Windows. Windows 10’s PC reset feature that will give you a fresh Windows system without necessarily wiping your files is one big help here.

How to Re-Enable System Restore

You can re-enable System Restore from the Control Panel. It will use some system storage space for its snapshots, so you probably won’t want to do this on inexpensive laptops and tablets with only a small amount of storage space. If you have a big hard drive in your PC, however, it won’t be a big deal.
Bear in mind that it’s disabled by default, so it hasn’t been creating snapshots. If you’re experiencing a system problem, re-enabling System Restore won’t help because you won’t have any old snapshots to restore. When you re-enable it, it will create a new snapshot — of your current system in its damaged state, if it’s damaged. If you want to enable and rely on System Restore, this must be done preemptively, before you have a problem.
This option is only available in the Control Panel, not the new Settings app. The quickest way to access System Restore settings will be to open the Start menu or Start screen, type “Restore” to search for it, and click the “Create a restore point” shortcut. You can also open the Control Panel, navigate to “System”, and click the “System Protection” link in the sidebar.
Open this window and you’ll see that system protection is “Off” for your Windows 10 system drive and the other drives in your computer. Select your system drive and click the “Configure” button if you want to enable it.
Click the “Turn on system protection” option and choose how much disk space you want to reserve for your restore points. The less space you provide, the fewer restore points System Restore will be able to kepe at once. Click “OK” and System Restore will be enabled.
To use System Restore in the future, just go back to the same “System Protection” panel you used above. Click the “System Restore” button — now no longer grayed out, assuming you enabled System Restore — and you can use System Restore to go back to a previous restore point.
If Windows isn’t normally bootable, you can also boot into Safe Mode and run System Restore, or launch System Restore from the “advanced startup options” recovery environment.

Other Ways to Fix System Problems

If you wanted to use System Restore to fix a problem but found out it’s been disabled all along, you’ll have to fix whatever system problem you’re encountering in another way.
If the problem was caused by a recent update, you can look at uninstalling that Windows Update or reverting to a previous “build” of Windows 10. This should fix problems that might occur due to Windows Update and issues with your specific hardware and software.
If your system files are corrupted, you can try using the SFC — system file check — command to scan your system files for problems and automatically repair them.
If you installed a program or hardware driver and the problem started after that, you can visit the Control Panel and uninstall that program or hardware driver.
If Windows isn’t booting properly so you can’t do any of this, you can boot into Safe Mode. You can also visit the “advanced startup options” screen — these will automatically appear if Windows 10 can’t boot normally — and use the options there.
There are many other ways to troubleshoot and fix a Windows 10 system. However, the one surefire solution will be to use the “Reset this PC” tool in the Settings app. This will wipe your Windows 10 system and restore it to factory-default settings. You’ll have to reinstall your software and reconfigure Windows afterwards. However, your personal files will be kept and won’t be erased. Whatever system problem you’re having, this will restore all your Windows 10 system files to their default state.

System Restore has always been a bit of a shotgun approach, just rolling back an entire system rather than fixing whatever that individual problem was. It used a bit of disk space, too.
Having it disabled by default is certainly a loss that makes tech support harder to perform. It used to be enabled by default and was a quick thing to try whenever a Windows PC isn’t working properly. Now, you just might have to use the “reset” feature instead.

What’s the Difference Between FAT32, exFAT, and NTFS?


Whether you’re formatting an internal drive, external drive, USB flash drive, or SD card, Windows will give you the choice of NTFS, FAT32, and exFAT. The Format dialog in Windows doesn’t explain the difference, so we will.
FAT32 is an older file system that’s largely relegated to USB flash drives and other external drives. Windows uses NTFS for its system drive, and it’s also ideal for other internal drives. exFAT is a modern replacement for FAT32, and more devices support it than do NTFS — although it’s not as widespread as FAT32.

FAT32

FAT32 is the oldest file system here. It was introduced all the way back in Windows 95 to replace the older FAT16 file system.
This file system’s age has advantages and disadvantages. Because it’s so old, it’s the de-facto standard. Flash drives you purchase will often come formatted with FAT32 for maximum compatibility across not just modern computers, but other devices like game consoles and anything with a USB port.
Limitations come with that age, however. Individual files on a FAT32 drive can’t be over 4 GB in size — that’s the maximum. A FAT32 partition must also be less than 8 TB, which is less of a limitations — but still a noticeable one if you have a new, high-capacity mechanical drive.
While this file system is okay for USB flash drives and other external media, you won’t want to use this for an internal drive. It lacks the permissions and other security features built into the more modern NTFS file system. Modern versions of Windows can no longer be installed to FAT32, and must be installed onto drives formatted with NTFS.
Compatibility: Works with all versions of Windows, Mac, Linux, game consoles, and practically anything with a USB port.
Limits: 4 GB maximum file size, 8 TB maximum partition size.
Ideal Use: Use it on removable drives for maximum compatibility with the widest range of devices, assuming you don’t have any files 4 GB or larger in size.
USB Devices Over Keyboard

NTFS

NTFS is the modern file system Windows likes to use. When you install Windows, it formats your system drive with the NTFS file system. NTFS has file size and partition size limits that are so theoretically huge you won’t run up against them. NTFS first appeared in consumer versions of Windows with Windows XP.
Aside from these limitations, NTFS is packed with other modern features. It supports file permissions for security, a change journal that can help quickly recover errors if your computer crashes, shadow copies for backups, encryption, disk quota limits, hard links, and other various features. Many of these are crucial for an operating system drive — especially file permissions.
Your Windows system partition must be NTFS. If you have a secondary drive alongside Windows and you plan on installing programs to it, you should probably go ahead and make it NTFS, too.
However, NTFS just isn’t as compatible with other operating systems. It’ll work with all recent versions of Windows — all the way back to Windows XP — but it has limited compatibility with other operating systems. By default, Mac OS X can only read NTFS drives, not write to them. Some Linux distributions may enable NTFS-writing support, but some may be read-only. None of Sony’s PlayStation consoles support NTFS. Even Microsoft’s own Xbox 360 can’t read NTFS drives, although the new Xbox One can. Other devices are even less likely to support NTFS.
Compatibility: Works with all versions of Windows, but read-only with Mac by default, and may be read-only by default with some Linux distributions. Other devices — with the exception of Microsoft’s Xbox One — probably won’t support NTFS.
Limits: No realistic file-size or partition size limits.
Ideal Use: Use it for your Windows system drive and other internal drives that will just be used with Windows.
hard drive with blue reflection. see portfolio for similar concepts.

exFAT

exFAT was introduced in 2006, and was added to older versions of Windows with updates to Windows XP and Windows Vista.
It’s a file system optimized for flash drives. It’s designed to be a lightweight file system like FAT32 without all NTFS’s extra features and overhead, but without FAT32’s limitations.
Like NTFS, exFAT has very large file size and partition size limits. This means you can store files that are larger than 4 GB apiece on a flash drive or SD card if it’s formatted with exFAT. exFAT is a strict upgrade over FAT32, and should be the best choice for external drives where you want a lightweight file system without FAT32’s file size limits.
exFAT is also more compatible than NTFS. While Mac OS X includes only read-only support for NTFS, Macs offer full read-write support for exFAT. exFAT drives can be accessed on Linux by installing the appropriate software.
While exFAT is compatible with Macs — and will be compatible with some devices that don’t support NTFS, like digital cameras — it still isn’t quite as compatible. Microsoft’s own Xbox 360 doesn’t support it, although the Xbox One does. The PlayStation 3 doesn’t support exFAT drives, although the PlayStation 4 reportedly does. Various other older devices may only support FAT32 instead of exFAT.
Compatibility: Works with all versions of Windows and modern versions of Mac OS X, but requires additional software on Linux. More devices support exFAT than support NTFS, but some — particularly older ones — may only support FAT32.
Limits: No realistic file-size or partition-size limits.
Ideal Use: Use it for USB flash drives and other external drives, especially if you need files of over 4 GB in size. Assuming every device you want to use the drive with supports exFAT, you should format your device with exFAT instead of FAT32.
Usb Flash Drives

NTFS is ideal for internal drives, while exFAT is generally ideal for flash drives. However, you may sometimes need to format an external drive with FAT32 if exFAT isn’t supported on a device you need to use it with.

Saturday, December 19, 2015

How To Install and Test Windows Without Affecting The Currently Installed OS

Most of you will have heard by now that Microsoft’s latest operating system, Windows 10, is now in testing phase and begins the long road to a final release sometime in 2015. This will please a lot of people because many of the changes in Windows 8 that made it so unpopular are being scaled back or even reversed completely. For Windows 8 or 8.1 users, this may be good news if you’re currently one of the many not entirely happy with features like the Start Screen or the heavy reliance on the Modern UI.
If you’re a Windows 7, Vista or even an XP user, you might want or need to upgrade and install something newer, whether it’s from XP to 7, or you’re a Windows 7 user looking to see if you’ll like the desktop friendlier Windows 10. Most users don’t try out a new version of Windows before actually buying a license or a prebuilt computer with a license already installed. In the main, it’s simply due to believing there’s a lot of work involved and they will have to erase or tamper with their current operating system to do so. Thankfully, this doesn’t have to be the case. Messing around with backups, Master Boot Records, multiboot menus and drive partitions can be a dangerous and time wasting, especially if you don’t plan to test the new operating system out for long or you’re inexperienced in these areas. The best and least destructive way to test drive a new operating system is in a virtual environment. Here we’ll show you how to easily get the version of Windows you want to test and how to quickly install it in a Virtual Machine so you can see how it works and whether you like it.

Downloading The Version Of Windows You Want To Test

Apart from the virtual machine software itself, you obviously need a version of Windows which you can use inside it. If you have a Windows installation DVD or ISO already, this can be used, but there are special versions of Windows Vista, 7, 8, 8.1 and 10 already pre-built as virtual machines by Microsoft, so you don’t have to go through the whole Windows install procedure. If you’re feeling nostalgic, even Windows XP is there!
1. Visit the Microsoft Modern.IE website . This will take you to the downloads page for all the virtual machines (VMs) Microsoft have created.
2. Click the button on Step 1. As Modern.IE is aimed primarily at testing websites on different versions of Windows and Internet Explorer, there are several distros for the same OS, such as Windows 7 with IE8-IE11, choose the latest IE version.
select virtual machine
3. With the Step 2 button select either ‘VirtualBox on Windows’ or ‘VMware Player on Windows’ depending on which software you are going to use. We will show you how to install on both VMware Player and VirtualBox below.
select virtualbox vmware
4. Step 3 will automatically display the download links you need to get the VM package. Either click on the links individually or use ‘Batch File Download’ to show all links together which can then be added into a download manager. As each file can be up to 1GB in size, MD5 checksum links are provided so the files can be verified for integrity after download.
These Windows VMs are also available to use in Linux and OS X, simply click the small link and go through the on page steps 1 and 2 again to show the correct files. VirtualBox, VMware Fusion and Parallels are supported.
download Virtual Machine
5. Go to your downloaded VM files and double click the Part001.exe to extract the contents to a folder of your choice. The Windows 10 Preview virtual machine doesn’t have a .exe and comes in plain RAR files so you will need an archiver capable of extracting them, such as WinRAR or 7-Zipetc. This will extract a single .OVA file in the case of VirtualBox or three files from the VMware archive, .MF, .OVF and .VMDK.
extract modern ie archive
Note the Windows 10 Technical Preview at Modern.IE is 64-bit and the rest of the operating systems in the list are 32-bit versions.

Running The Virtual Windows In VirtualBox

VirtualBox is currently owned by Oracle and is a hugely popular virtual machine software, it is also cross platform with versions for Mac and Linux as well as Windows. While we’re fans of VirtualBox in general, it isn’t the most reliable software and recent updates to the program have also caused major issues for many users, for this reason we use a slightly older version of 4.3.12.
1. Go to the website and download VirtualBox . If you wish to use the older more stable version 4.3.12, download it from the older builds page .
2. Install VirtualBox using the default options, you can of course change the installation folder if required but make sure to leave the file associations option enabled.
3. Double click the extracted .OVA file which automatically launches VirtualBox and pops up a window with the pre-defined settings for the VM. Unless you specifically want to disable sound or the optical drive etc, simply click Import.
import virtual appliance
4. After spending some minutes importing the package to VirtualBox, the VM will be ready to use. Make sure the VM is highlighted in the list on the left and click Start to boot it up.
start the virtual machine
After some screens saying your installation is being configured, you will eventually reach the desktop of your chosen OS. These Virtual machines have a preset default username of IEUser and a password of Passw0rd! (XP lets you create your own password). Various information is displayed on the desktop, you can change this by altering the desktop background or theme.
virtualbox booted os
Once installed there are a few changes you can make such as altering the default amount of memory used (no lower than 1GB for Vista, 7, 8 or 10) or increasing the number of used processor cores, the virtual Windows needs to be shutdown to do this. Guest additions can also be installed that adds shared folders and improves the performance and graphics of the Windows VM, which is accessible from the Devices menu while the VM is running.
Note: If you run into a black screen while testing Windows 8 or 10 in VirtualBox, especially an error that ends in 5D, you may need to look for and enable a setting in your system BIOS called “No-Execute Memory Protection”, also known as “Data Execution Prevention”.

Running The Virtual Windows In VMware Player

VMware Player is basically a cutdown version of the full and expensive VMware package, which is regarded as probably the best virtual machine software around. Although Player is missing a few things like snapshots which are available in VirtualBox, it is definitely more stable, easier to use and the virtual operating system generally runs slightly faster than in VirtualBox.
1. Download VMware Player , then install it on your computer. There are no special options to configure during installation.
2. In the extracted folder from Modern.IE, double click on the .OVF file. A new window will show that asks what name you want to call the virtual machine and where to store it. Make sure the save location has plenty of storage space available, at least 15-20GB for Vista and above. Click Import and wait a few minutes for the process to complete.
import vmware virtual machine
3. Once step 2 is finished, VMware Player will automatically start to boot the VM. If you receive a message that VMware Tools is outdated and an update is available, you can either let it update now or later on. The good thing is VMware Tools is already installed and is similar to VirtualBox’s Guest Additions that improves several areas of the VM performance. The only issue is it may need updating depending how old the virtual machine files are at Modern.IE and whether a newer VMware Player has been released since.
booted vmware machine
Ctrl+D > Options will allow you to add shared folders straight away. Shutting down the virtual machine first and pressing Ctrl+D will allow you to edit the hardware configuration such as memory allocation or CPU cores, Sound, ROM drive etc.

Notes: As you might expect, the virtual machines at Modern.IE aren’t fully activated versions of Windows (if only!) or ones that you activate with a real product key. They are essentially Enterprise version trials that usually work for 90-120 days. As this article is about testing or trying out a different version of Windows for a short period, the time frame should be long enough to get you well acquainted with your chosen Windows operating system.
A simple workaround to get it working again after your time expires is deleting the old virtual machine from the software and then importing it again from the downloaded files. Alternatively, using the Snapshot feature in VirtualBox will help lengthen the time until expiry.
For best results you need make sure Intel VT-x or AMD-V hardware virtualization extensions are enabled in your system BIOS, you have 4GB+ of system memory, a dual/quad core CPU and plenty of hard drive space. All is not lost if you don’t have these but the specification of the virtual machine’s hardware will have to be lowered and its performance will be reduced.
Read More:https://www.raymond.cc/blog/step-by-step-on-how-to-download-install-and-activate-windows-7-beta-without-messing-currently-installed-os-and-dual-boot/

Tuesday, December 8, 2015

How to Find Saved WiFi Passwords in Windows

Once you connect all of your devices to your Wi-Fi router at home, you'll never need that long, complicated Wi-Fi password ever again, right?
Unfortunately, life isn't that easy. If you need to reset the network settings on your phone or tablet, or have a friend or family member who needs to check their email real quick, you're going to need to remember that long, complicated password.
If you don't have it written down anywhere, there's a way you can find out what it is on your Windows PC, as long as you're still connected to the Wi-Fi hotspot. Just note that this trick only works if you are a local admin on your computer. If not, you'll need to enter the admin username and password.
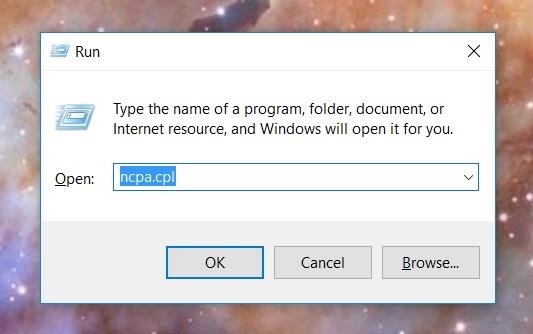
  1. Go to your network adapter settings. (This can be done by accessing Network Connections through the Control Panel, by using the Run menu (pressing Win+R on your keyboard and typing in "ncpa.cpl"), or by simply typing in "ncpa.cpl" in the Start menu.)
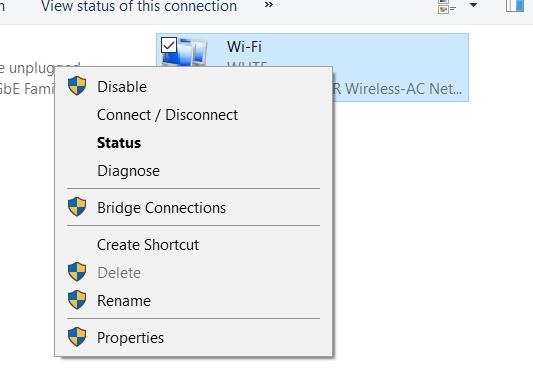
  1. Once the Network Connections window pops up, find your wireless network, right-click on it, and select "Status" from the menu.
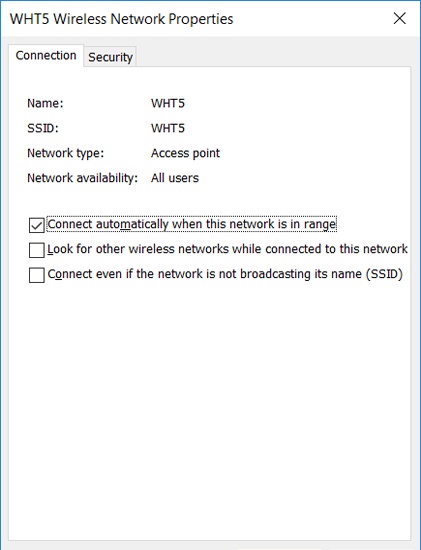
  1. In the Wi-Fi Status window, tap on "Wireless Properties."
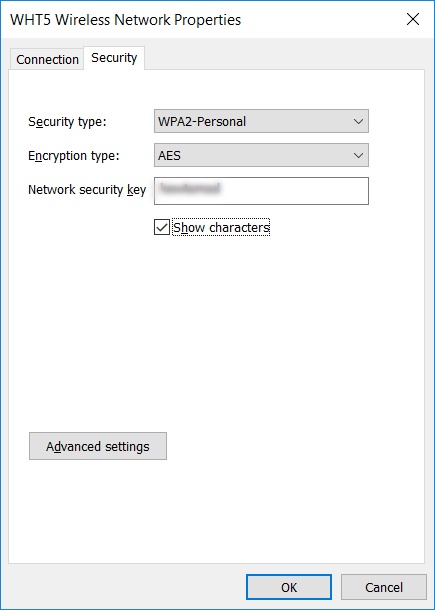
  1. Go to the Security tab, and check the box next to "Show characters."
  2. Your password will appear in the text box next to "Network security key."
And with the password in-hand, you can give it away to a friend or family member, use it on your other devices, or even just jot it down somewhere so you can quickly access it later without having to go through this process again.

Hidden Screen Recorder Tool in Windows 10

Up until now, if you wanted to record videos of the apps on your screen, you had to rely on a third-party option. However, Windows 10 changes this thanks in part to the new Xbox app. One of the new features of the Xbox app is the Game bar, which allows you to record footage of your gameplay.
The new Game bar in the Xbox app for Windows 10.
But as it turns out, that this functionality allows you to not only record video games, but capture footage inside most of your apps as well. Naturally, this hidden functionality to record your apps has most users quite excited.
Accessing the Game bar is straightforward. Simply press and hold theWindows and G keys. The Game bar, which is essentially a toolbar, will then pop up on screen. If it's your first time launching the Game bar for that app, you will get a message asking, "Do you want to open Game bar?"—simply click on "Yes, this is a game."
Once launched, it's pretty straightforward to use. To start recording video inside the app, just hit the red button. Or if you prefer keyboard shortcuts,Windows + Alt + R. You can also capture screenshots using the camera button, or Windows + Alt + PrtScr.

Adjust Settings

Inside the settings section (click on gear icon), you can enable background recording, which as the name implies, will allow you to record in the background. You can also set the max length for recording, toggle the option for showing the timer during a recording, disable the notification balloons, and more. And finally, you can launch the Xbox app to access even more settings.
The recorded videos are stored in MP4 format inside the Game DVR section of the Xbox app, or you can manually navigate to the location in your user folder under Videos -> Captures.
As of right now, the video recording is only available inside apps. So if you want to record your desktop screen or file explorer, you cannot do this with the Game DVR. You will also need to meet the certain hardware requirements in order to use the Game DVR.
Accessing the new Game bar and using the Game DVR functionality, which ships with the new Xbox app in Windows 10, is pretty straightforward. Of course, if you want more robust options to record your screen, then as of now, you will have to utilize a third-party utility, but for basic needs this will get the job done. Including this functionality in Windows 10 was the right step forward for Microsoft and for the millions of Windows users out there.